Courses, modules & lessons
Build and maintain your course catalogue in CLIP Learn — create courses, structure modules and lessons, author lessons in the visual editor, draft modules with AI, and attach practice questions and flashcards.
Your course catalogue is where you build everything a learner sees: courses, the modules inside them, and the lessons inside each module. Every lesson you write also becomes source material for MOEgent (the AI trainer), so the same content that teaches learners on the page also grounds the assistant that answers their questions. This page covers the whole authoring surface — creating courses, structuring modules and lessons, the visual lesson editor, AI-drafting a module, and attaching practice questions and flashcards to a lesson.
Who can do this
Everything on these pages requires the FACULTY or ADMIN role. All content is scoped to your tenant (your organisation): you can only see, edit, reorder, or delete courses, modules, lessons, questions and flashcards that belong to your own tenant, even if you know another tenant's internal id. Learners and other roles cannot reach these pages at all.
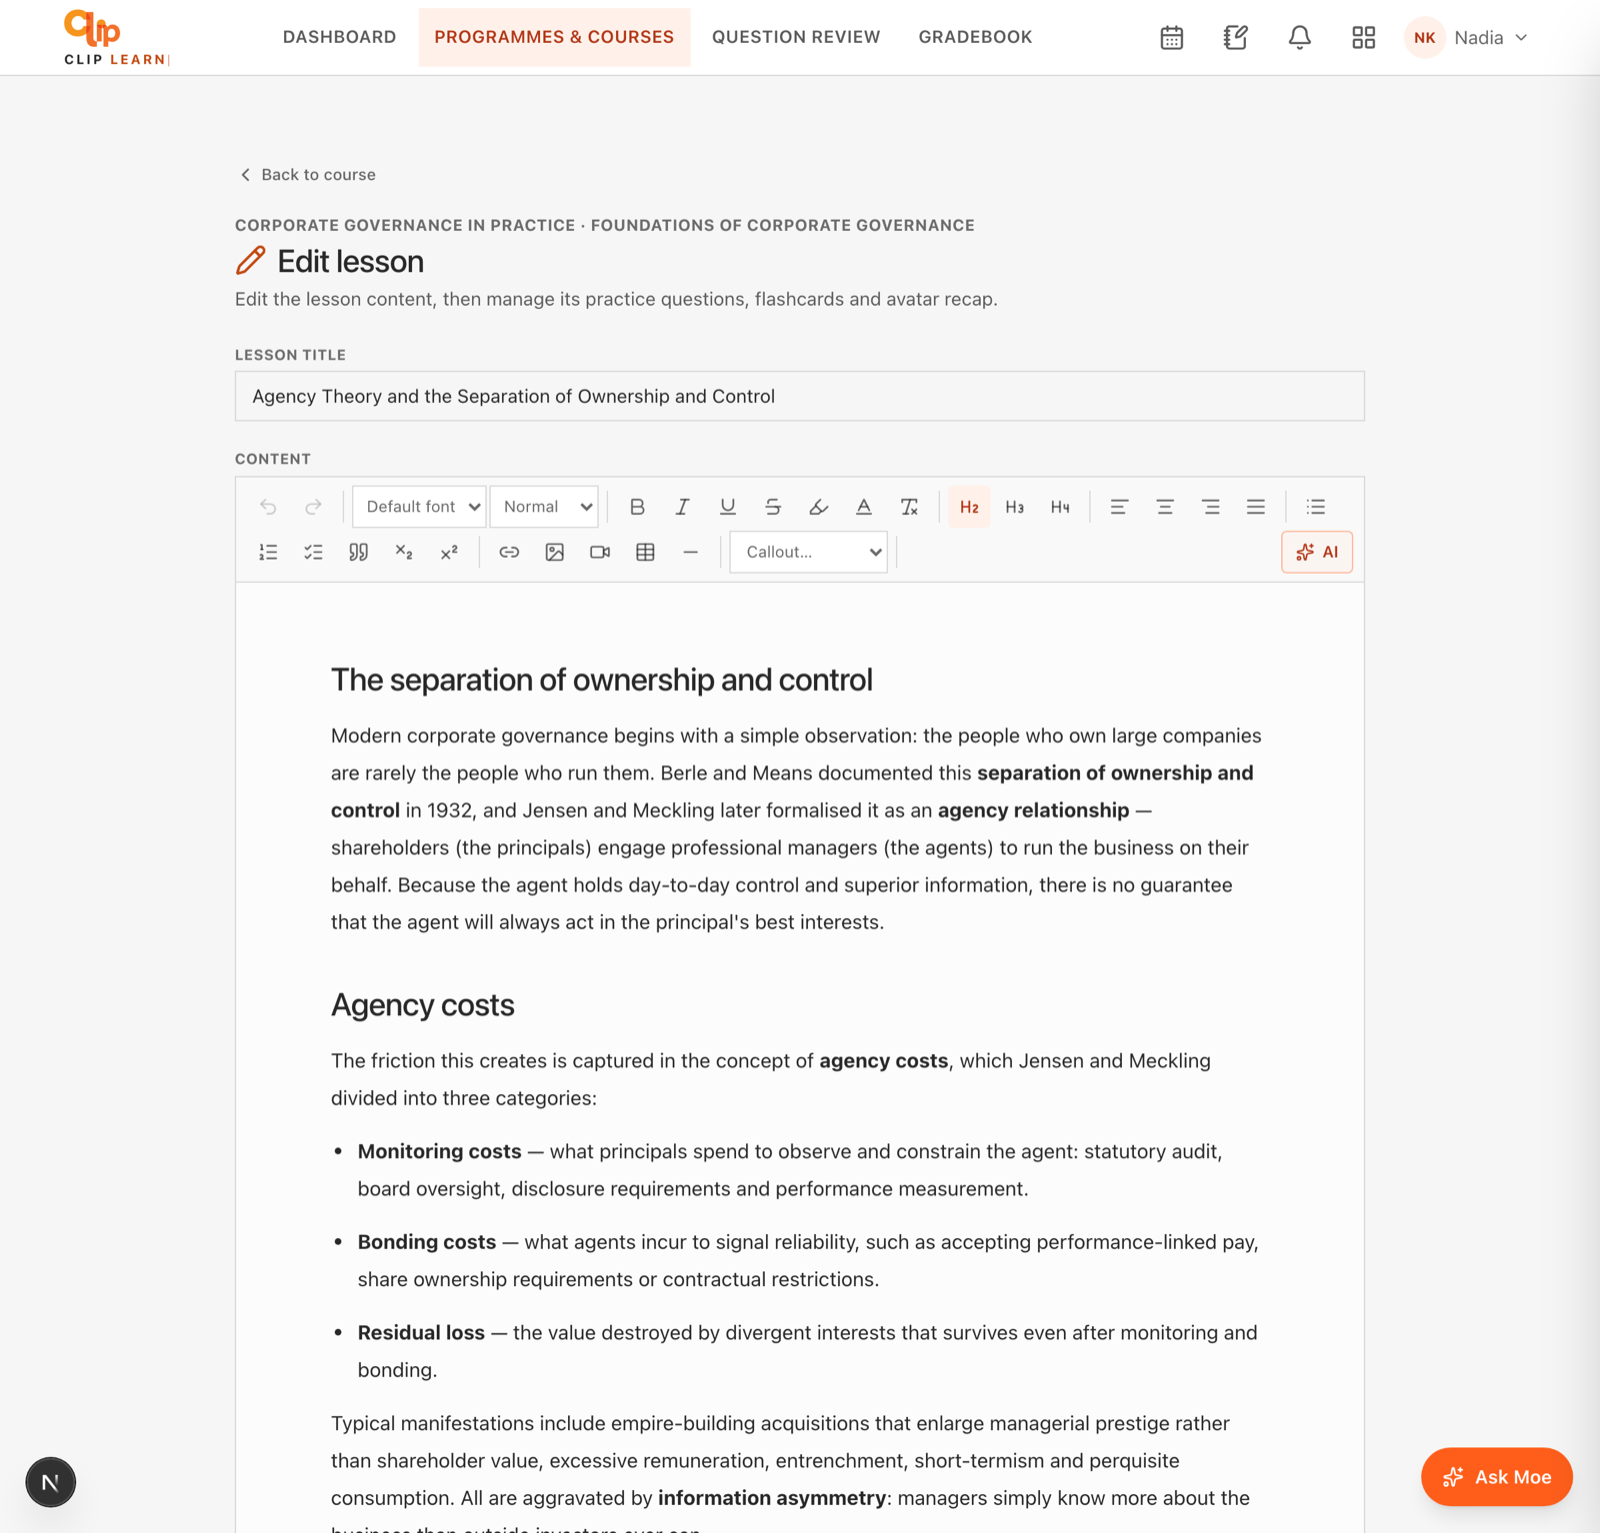
Write lessons with headings, callouts, images and video — plus AI assistance. Every saved lesson also grounds Moe.
Where to find it
From any Faculty screen, open Programmes & courses in the top navigation (/faculty/catalog). This is the catalogue home. It shows two sections: Programmes (bundles of courses — covered on their own page) and Courses. Each course card shows its module count, lesson count, and past-paper question count, and links to that course's editor.
Creating a course
| Field | What it does | Notes |
|---|---|---|
| Course title | The course name shown everywhere. | Required. Trimmed, max 140 characters. |
| Subtitle | An optional one-line strapline under the title. | Max 200 characters. Left blank stores nothing. |
| Description | Longer summary of the course. | Max 4000 characters. |
Slugs are automatic
The URL slug is generated from the title (lower-cased, non-alphanumeric runs become hyphens, trimmed to 48 characters). If that slug is already taken, a random 4-digit suffix is appended so it stays unique. You do not set the slug by hand.
The course editor
Opening a course (click any course card, or you land here after creating one) gives you the full editor at /faculty/catalog/course/<id>. It has four areas, top to bottom: course metadata, the modules and lessons list, Add module / Draft a module with AI, and MOEgent on WhatsApp.
Everything you add teaches the trainer
A banner in the editor reminds you: every published lesson is taught to MOEgent automatically. When you save a lesson, its plain text is written into the knowledge base as a "knowledge chunk" tagged with a readable citation (Course › Module › Lesson), so the assistant can answer from it and cite where the answer came from. Draft (AI-authored, unpublished) lessons are the one exception — see the SME gate below.
Editing course metadata
The top card lets you edit the Title, Subtitle and Description you set at creation. Change any of them and press Save details. Same limits apply (title 140, subtitle 200, description 4000 characters).
Publishing / unpublishing a course
A course carries a published flag. When it is off, the course is hidden from learners (it is treated as archived); when on, learners can see and enrol. New courses are created Published by default. Programmes have a Published checkbox on their own management page; toggling a whole course's published state is a supported action at the platform level but is not exposed as a button in the current course-editor UI — new courses simply start published.
Modules
A module is a titled section that holds an ordered list of lessons. A course can have any number of modules, shown in order.
Add a module
At the bottom of the modules list, use the dashed New module row: type a title and press Add module. It is appended after the existing modules (its order is set to the current count plus one). Title is required, max 140 characters.
Rename a module
Each module header is an editable title field. Change the text and press Rename (the small label to its right). Max 140 characters.
Reorder a module
Use the up (▲) and down (▼) chevrons in the module header. Each press swaps the module with its immediate neighbour. The up arrow is disabled on the first module and the down arrow on the last.
Delete a module
Press the trash icon in the module header. You will be asked to confirm — "Delete this module and ALL its lessons? This cannot be undone." Deleting a module removes all its lessons and clears their knowledge-base chunks (so MOEgent immediately stops answering from that removed material). This cannot be undone.
Lessons
Each module lists its lessons in order. A lesson row shows its title, small status badges, and controls.
| Badge | Meaning |
|---|---|
| Visual | The lesson has rich HTML from the visual editor (contentHtml is set); the reader shows that rich version. |
| AI draft (amber) | The lesson was AI-authored and is still a draft — hidden from learners, not yet grounding MOEgent. |
Add a lesson (quick add)
At the bottom of each module is an Add lesson form. This is the fast, text-based way to add a lesson; for rich formatting you open the lesson afterwards in the visual editor.
| Field | What it does | Notes |
|---|---|---|
| Lesson title | The lesson name. | Required. Max 160 characters. |
| Lesson content | The lesson body, in Markdown. Becomes MOEgent's source material. | Required. Max 20,000 characters. |
| Things to remember | Optional recap, Markdown bullets, shown as a callout. | Max 3000 characters. Blank stores nothing. |
Reading time is calculated for you
Every lesson's estimated duration is derived from its word count (roughly words divided by 130), then clamped to between 3 and 30 minutes. You do not set it manually. It is recalculated each time you save the lesson's content.
Reorder a lesson
Use the up/down chevrons at the left of each lesson row. Each press swaps the lesson with its neighbour within the module. Disabled at the first/last position.
Delete a lesson
Press the trash icon at the right of the lesson row. This deletes the lesson and its knowledge-base chunks (so MOEgent stops using it). Note there is no extra confirmation dialog on a single-lesson delete — the click removes it.
AI-draft a module (the SME gate)
Below Add module is the Draft a module with AI panel. It uses MOEgent to write a first draft of an entire module — one lesson per topic you give it — for a subject-matter expert (SME) to review before anything reaches learners.
## sections, a worked example where useful, and a Key takeaways list) and creates the module.Why drafts are hidden — the SME gate
AI-authored lessons land as AI draft and are deliberately held back in two ways: they are hidden from learners, and they do not create any knowledge-base chunk — so MOEgent will not answer from them either. Nothing an AI wrote reaches a learner (on-page or via the assistant) until a human trainer has reviewed and published it. Blank topic lines are ignored; only the first 6 topics are used. If the AI service is unavailable or returns nothing usable, no module is created.
The AI author is instructed to stick to mainstream, well-established UK company-law and governance principles (this content prepares CGI students), to avoid inventing case names, statute sections or figures, and to mark any place needing a precise citation with [verify]. Treat every draft as a starting point to correct, not finished copy.
Publishing a draft lesson
An AI draft lesson shows a Publish button on its row. Pressing it reveals the lesson to learners and grounds it in MOEgent's knowledge base (using the visual HTML if present, otherwise the Markdown content). Review the lesson first — publishing is the moment its content starts being taught and answered from.
The visual lesson editor
Click any lesson (the pencil/title link) to open the full-page visual editor at /faculty/catalog/course/<id>/lesson/<lessonId>. This is a Word-style rich editor built on TipTap. The header shows the course and module breadcrumb. There are three edited areas: Lesson title, Content, and Things to remember.
Legacy lessons convert once
A lesson that only has Markdown (from quick-add or seed data) is converted to HTML the first time you open it in the visual editor. From then on the rich HTML is the source of truth for the reader.
Saving
Press Save lesson to store the title and rich content and return to the course. The Content area must not be empty and the title must be present, or the save is ignored. On save, the lesson's plain-text is re-synced into the knowledge base (HTML is never stored there — retrieval stays clean text) and the reading time is recalculated. Cancel returns to the course without saving.
| Field | What it does | Notes |
|---|---|---|
| Lesson title | The lesson name. | Max 160 characters. |
| Content | The rich lesson body authored with the toolbar. Preferred by the reader over any Markdown. | Required to save. Max 80,000 characters of HTML. |
| Things to remember | A rich recap callout learners see at the end of the lesson. | Optional. Max 8000 characters of HTML. |
Toolbar reference
The ribbon runs left to right. Buttons highlight when active for the current selection.
| Control | What it does |
|---|---|
| Undo / Redo | Step backwards/forwards through your edits. |
| Font | Choose Default, Sans, Serif or Mono for the selection. |
| Size | Small, Normal, Large or Heading text size. |
| Bold / Italic / Underline / Strikethrough | Standard character formatting. |
| Highlight | Marks the selection as a key term (styled highlight). |
| Text colour | Pick any colour; a swatch of brand colours is suggested. |
| Clear formatting | Removes marks and colour from the selection. |
| Heading / Subheading / Small heading | Toggle H2, H3 and H4 headings. |
| Align left / centre / right / justify | Paragraph and heading alignment. |
| Bullet list / Numbered list / Checklist | The three list types (checklist items are tickable). |
| Quote | Block quotation. |
| Subscript / Superscript | For footnote marks, formulae, and similar. |
| Link | Prompts for a URL; leaving it blank removes an existing link. |
| Image | Uploads and inserts an image at the cursor (see media limits). |
| Video | Uploads and inserts a playable video. |
| Table | Inserts a 3×3 table with a header row. When your cursor is inside a table, extra buttons appear: Add row, Add column, Delete table. |
| Divider | Inserts a horizontal rule. |
| Callout | A dropdown that wraps the selection in a coloured callout box (see kinds below). |
| AI | Opens the AI assistant panel on the right (see below). |
A status bar at the bottom of the editor shows a live word count.
Callouts
The Callout dropdown wraps the current block in a highlighted panel with a coloured label. Choosing the blank option removes the callout. The kinds are:
| Kind | Label shown |
|---|---|
| conduct | Conduct point |
| key | Key point |
| note | Note |
| example | Example |
| warning | Watch out |
| tip | Tip |
| exam | Exam focus |
These render identically for you in the editor and for the learner in the reader (they match the :::kind Markdown callout blocks used elsewhere).
Images and video
Insert images with the image button, or simply paste or drag-and-drop an image straight into the document — it uploads and drops in at the cursor. Video is inserted with the video button and plays inline with controls, streamed so learners can seek and progressively play.
| Media | Allowed types | Size limit |
|---|---|---|
| Image | PNG, JPEG, GIF, WebP | 15 MB |
| 15 MB | ||
| Video | MP4, WebM | 200 MB |
SVG is not accepted
SVG uploads are deliberately blocked because an SVG can carry script (a stored cross-site-scripting risk when served inline). Use PNG or WebP instead. Any unsupported type is rejected with an error.
Things to remember
The second rich editor on the page authors the Things to remember recap — the key points a learner should walk away remembering. It is optional and displayed as a callout at the end of the lesson.
AI assistant (in the editor)
The AI button opens a right-hand panel with two tools:
- Rewrite selection — select text, then choose Improve writing (clarity, flow, concision), Humanize (de-AI the phrasing), Simplify (plainer, for new learners) or Expand (more detail plus an example). The selected text is replaced in place.
- AI detection — press Check AI score to score the selection (or the whole lesson if nothing is selected) for how AI-like the writing reads. It returns a percentage, a band, and a breakdown of AI-generated / AI-refined / human-written. Sentences that read as AI-like are highlighted in the document; right-click any highlighted sentence to Humanize, Improve, Simplify or Expand just that sentence, or clear the highlights.
Practice questions on a lesson
Below the editor, the Practice questions section lists the multiple-choice questions tied to this lesson — used in practice drills and mock exams. It shows both questions assigned to this lesson and questions in the wider module pool (questions whose topic equals the module title), so nothing is hidden and you can pull existing items onto a specific lesson.
Each row shows a scope badge — This lesson or Module — and a review-status badge:
| Status | Meaning |
|---|---|
| PUBLISHED (green) | Live; served to learners. |
| DRAFT (amber) | Not yet served to learners. |
| ARCHIVED (grey) | Retired; not served. |
For each question you can:
- Assign — attach a module-pool question to this specific lesson.
- Unassign — detach it from this lesson (it falls back to the module pool).
- Edit — opens the question editor.
- New question (top right) — create a fresh question already scoped to this course and lesson.
If there are no questions for the lesson or its module yet, you see an empty note.
Authoring a question
The New question and Edit links take you to the dedicated question editor. Writing a full multiple-choice question (stem, five options A–E, correct key, rationale, hints, difficulty, skill type) is covered on its own page.
Flashcards on a lesson
The Flashcards section holds front/back recall cards for the lesson. Like questions, it shows both cards assigned to this lesson and module-pool cards you can pull in (cards tagged with the module title). Module-only cards carry a Module card badge.
Add a flashcard
Use the form at the top of the section: fill the Front (prompt or term) and Back (answer) and press Add card. Both are required. New cards are created as PUBLISHED and tagged with the module's title as their topic.
| Field | What it does | Notes |
|---|---|---|
| Front | The prompt or term shown first. | Required. Max 2000 characters. |
| Back | The answer revealed on flip. | Required. Max 4000 characters. |
Assign, unassign, delete
- Assign — attach a module-pool card to this lesson (this also claims a legacy/global card into your tenant as it attaches).
- Unassign — detach the card from this lesson.
- Delete (trash icon, only on cards already assigned to the lesson) — asks "Delete this flashcard?" to confirm, then removes it.
MOEgent on WhatsApp (per course)
At the bottom of the course editor you can attach a WhatsApp channel to the course, so — once the gateway's inbound webhook is enabled — MOEgent can answer in WhatsApp with the same grounding it uses in-app, and learners get a direct link.
+9715…) or a WhatsApp group id — at least one is required.Related pages
My tasks & Scratchpad
A personal work queue that mirrors your live marking load — essays, learner questions, drafts, agenda-less sessions — plus a private sticky-note scratchpad with an AI polish.
Learner materials
Curate what appears in every learner's Library — add official CGI and CLIP materials as external links or read-in-app pages, then publish or hold as a draft.